
Christmas Pie Crust Design
Hi there, foodies, let’s show you a new and tasty recipe. Let’s get the Christmas holiday groovy with this Christmas pie crust design.
The holiday season is all about spreading joy and creating cherished memories with your loved ones. One exciting way to infuse some festive cheer into your culinary creations is by incorporating stunning pie crust designs. A beautifully decorated pie not only captures the spirit of Christmas but also becomes a centerpiece on your dessert table.
In this article, we’ll show you some simple yet elegant Christmas pie crust designs that are easy to follow, allowing you to impress your loved ones with your baking prowess.
Elegant Christmas Pie Crust Designs
Equipment
- 1 Kneading pin
- 1 pie top cutter design
- 1 Brush
Ingredients
- Flour
- Dough
- Pie
- Egg
Instructions
Directions
- Add some flour onto a clean countertop. Roll out your dough using a kneading pin.
- Roll it out nicely to a 12'' size. Lightly flour the surface of the pie top cutter design.
- Now, press down firmly on the flattened out dough. When you're sure the compress is done, raise the pie cutter up to reveal the nice designs imprinted.
- Now, remove the designs and keep the cut outs. Don't forget. It can be used again and again.
- Once that is done, we will roll the dough again. Carefully roll the crust around the floured rolling pin to transfer.
- Get your pie and place the crust center design on top of the pie. Next, using a fork, as shown in the video, seal the crust together.
- You can add your crusts for extra details. Now, brush with egg wash. You can bake afterward.
Christmas pie crust designs
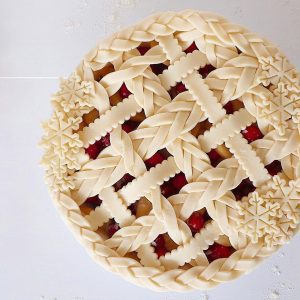
- Classic Lattice Design: The classic lattice design is a timeless choice that adds a touch of elegance to any pie. To create this pattern, start by rolling out your pie dough and cut thin strips using a sharp knife or a fluted pastry wheel. Next, lay half of the strips vertically across the pie, and evenly spaced apart. Fold back every other strip halfway and place a horizontal strip in the middle. Unfold the folded strips and fold back the alternate strips. Repeat this process until you have covered the entire pie, weaving the strips over and under each other. Trim any excess dough and crimp the edges to seal.
- Festive Cut-Out Shapes:Roll out the dough and cut shapes such as stars, snowflakes, or Christmas trees using cookie cutters. Now, carefully place the cut-outs on top of the filled pie, slightly overlapping them if desired. Ensure the shapes are evenly distributed. For an added touch, brush the cut-outs with an egg wash and sprinkle them with colored sugar or edible glitter before baking.
- Delicate Braided Edge:Start this process by rolling out the dough and cutting thin strips. Gather three strips together and press them at one end to join. Braid the strips together gently, taking care not to stretch them too much. Once the braid is complete, carefully press it onto the rim of the pie, sealing it by pressing the ends together. Continue around the entire circumference of the pie.
- Sprinkled Sugar Crust:A sprinkle of sugar can transform an ordinary pie into a dazzling holiday delight. After rolling out the pie dough and placing it in the pie dish, generously sprinkle granulated or coarse sugar over the entire surface of the dough. Lightly press the sugar into the dough to ensure it adheres. As the pie bakes, the sugar will create a sparkling, golden crust that adds a delightful crunch and sweetness to each bite.
- Festive Stenciled Design:Roll out the dough and place it over the filled pie. Now, secure the stencil of your choice on top and lightly dust powdered sugar or cocoa powder over it using a fine-mesh sieve. Next, carefully remove the stencil, revealing a beautiful pattern on your pie crust. It's a simple yet impressive way to create a unique design.
Video
YouTube Video Credit: Nordic Ware
Frequently Asked Question on Elegant Christmas Pie Crust Designs
1. What is an elegant Christmas pie crust design?
An elegant Christmas pie crust design consists of beautiful patterns and embellishments on the crust of a Christmas pie that improve its visual appeal. These designs frequently feature festive features such as holly leaves, snowflakes, Christmas trees, and other holiday-themed forms, resulting in a visually appealing presentation.
2. How can I achieve a perfect Pie Crust for Christmas?
Follow these steps to make the ideal pie crust for Christmas.
- Use cold things like chilled butter and ice water.
- Handle the dough lightly to avoid overwork and harshness.
- To maintain flakiness, chill the dough before rolling it out.
- Roll out the crust uniformly to the desired thickness.
- Select a decorative design that reflects the Christmas theme.
3. What tools do I need for creating elegant Christmas pie crust designs?
Follow these steps to make the ideal pie crust for Christmas.
- Use cold things like chilled butter and ice water.
- Handle the dough lightly to avoid overwork and harshness.
- To maintain flakiness, chill the dough before rolling it out.
- Roll out the crust uniformly to the desired thickness.
- Select a decorative design that reflects the Christmas theme.
4. Can I use any pie crust recipe for creating decorative designs?
Yes, you can use your favorite pie crust recipe to make decorative patterns. Make sure the dough has the proper consistency and is easy to work with. For detailed designs, add a little extra flour or water as needed to obtain the appropriate texture.
5. How can I prevent my pie crust from shrinking during baking?
To keep the pie crust from shrinking while baking:
- Allow the pie dough to chill in the refrigerator before rolling it out.
- Roll the dough out evenly and to the appropriate size.
- When transferring the dough to the pie dish, avoid stretching it.
- When blind baking, use pie weights or dry beans to assist the crust hold its shape.
6. Are there any vegan or gluten-free options for creating elegant Christmas pie crust designs?
Yes, you may find vegan and gluten-free pie crust recipes for making exquisite Christmas decorations. Substitute vegan butter or gluten-free flour as needed. Make sure that any ornamental components adhere to dietary restrictions.
7. Can I prepare the pie crust designs in advance?
Yes, you may plan out your pie crust designs in advance. Cut out the shapes and freeze on a baking sheet. Once frozen, store the forms in a sealed container or bag. When ready to use, place the frozen forms on top of the pie filling and bake as directed. This enables convenient preparation ahead of time.
This looks so good! What a fun project to do with kids!