Pie Crust Designs
Have you ever tried to make some pie crust designs on your own? Probably tried a few to see if they would turn out right? Let’s show you how to make some of the most beautiful pie crust designs you’ll ever see.
In this tutorial, you’ll learn how to make pies that are absolutely delicious and too pretty to eat. Let’s show you how to make them.

Splendid Pie Crust Designs
Equipment
- 1 Baking oven
- 1 Circle cutter
- Foil
- 1 Pie dish
- 1 Pie plate
- 1 Large bowl
Ingredients
Mixed Apple Pie, with Apple “Chain Link” Design:
- 3 tbspspacked brown sugar
- 6 mixed apples
- 2store-bought pie crust
- 2 tspslemon juice
- 1 tsp ground cinnamon
Instructions
- 1. Mixed Apple Pie, with Apple “Chain Link” Design:reheat the oven to 400 degrees F
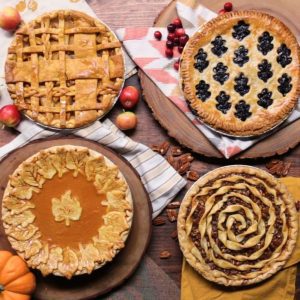
- Cut the apples, leaving the peel on! For this design core the apple and then slice it vertically. Then Now, using a small circle cutter, cut holes in the center of each slice. Keep the circles to be used later!
- Now, cut a small slit in the apples. To keep them fresh while you work on the link, you can keep them in a bowl of lemon water!
- Once the apples are cut and ready, toss both the center pieces and the ring pieces with brown sugar, cornstarch, cinnamon, vanilla and lemon juice.
- As soon as that is done, link them together creating an apple train. Place one of the pie crust sheets in a 9-in. pie plate, then, trim crust even with rim, add in the center pieces and add the apple chain to pie.
- Next, bake 35-40 minutes or until the crust is golden brown and filling is bubbly. Cover edge loosely with foil during the last 20 minutes if needed to prevent overbrowning.
- For the last part, remove foil. Allow it to get cool and enjoy!
Fresh Strawberry Pie:
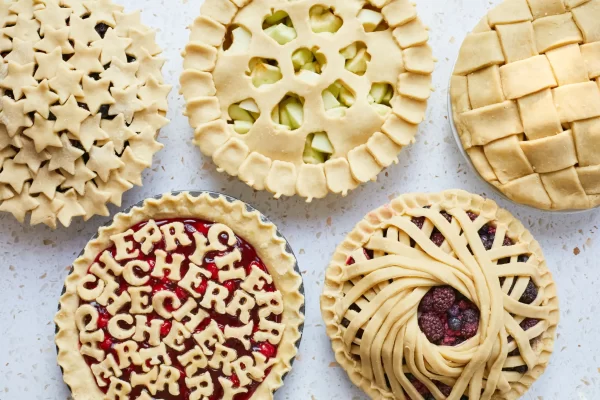
- Then, Place one of the pie crust sheets in a 9-in. pie plate. Try to trim the crust even with rim and add filling. Next, to create the Heart Starburst Design, lightly flour a flat yourr face and lay out the other pie sheet. If you already have your shapes, get ready but if you haven't, cut heart shapes, then place the hearts in the center of the pie.
- Now, brush hearts with milk and sprinkle a little sugar all over it.
- For this next step, bake 35-40 minutes or until the crust is golden brown and filling is bubbly. Cover edge loosely with foil during the last 20 minutes if needed to prevent overbrowning. Enjoy.
Blackberry Pie, with Variety Crust:
- Let's start by preheating the oven to 425 degrees. Once that is done, place one pie crust in a 9″ pie dish. Trim and fold edges over, and crimp, pinch, or flute around the entire edge.
- Now, in a large bowl, stir together your blackberries, lemon juice, sugar, flour until well combined.
- Next, transfer the combined blackberry mixture into pie crust in dish, leaving any excess liquid in the bowl.
- Now, place the cold butter pieces on top. Using house-hold items, or any items you wish to design with, create a variety of your favorite pie designs out of the trim or the second pie dough and place on trim.
- Next, we'll bake at 425 degrees for 15 minutes. After 15 minutes, cover trim with tinfoil to keep the edges from burning and lower temperature to 375 degrees.
- Allow to bake for 45 – 50 more minutes, or until done the crust is golden. Let it cool and enjoy!
Ginger Peach Pie, with Graphic Crust:
- Next, in a large bowl, toss together the peaches, honey, sugar, cornstarch, lemon juice, and ginger. Mix them all up. Pour into the prepared pie pan.
- Cut -out the letters of ‘peach’ multiple times out of the second pie crust and place on top of the filling, allowing the letters to overlay each other. BrushCheck the video to see how it looks. Now, bake in the preheated oven for 60 minutes, or until the crust is golden brown. Let it cool and enjoy!
Cinnamon Apple Pie, with “Cinnamon Swirl” Twisted Crust:
- Now, place one of the pie crust sheets in a 9-inch pie plate. Go ahead and trim crust even with rim and add filling.
- To create the Twist Design, lightly flour a flat surface and lay out the other two pie sheets. Next, roll out the pie crust two be slightly thinner than your typical pie crust.Sprinkle both with the sugar and cinnamon.
- Then place one on top of the other. Create cuts and then twist to connect the top layer and the bottom.
- Once that is done, place on top of the pie with filling. Trim excess & brush with egg wash. Bake 35-40 minutes or until the crust is golden brown and filling is bubbly. Cover edge loosely with foil during the last 20 minutes if needed to prevent overbrowning. Cool and enjoy!
Video
Frequently Asked Questions About Pie Crust Designs:
1. How do I create a decorative edge for my pie crust?
Use your fingers, a fork, or special pie crust tools to flute or crimp the edges to create a decorative edge. Try out a variety of patterns until you discover one you like.
2. Can I add color to my pie crust?
Yes, you can use food coloring or other ingredients like fruit juice or vegetable puree to give color to your pie crust. This can improve your pie’s aesthetic appeal.
3. What’s the best way to make a braided edge for a pie crust?
Roll out the pie dough and braid the strips to create a braided edging. Gently push the braids onto the pie’s edge to secure them.
4. How can I achieve a lattice crust design?
The pie dough is rolled out and then cut into strips. Over the pie filling, weave the strips in a lattice design. Trim any excess dough and pinch the corners to seal.
5. Can I use cookie cutters for pie crust shapes?
Of course! Using cookie cutters to cut your pie crust into different shapes is a lot of fun. For a decorative touch, cut out shapes and put them on top of your pie.
6. How do I make a cut-out design on my pie crust?
Roll out the dough and use a knife or tiny cookie cutters to cut out shapes. Before baking, place the cutouts on the pie’s surface.
7. What’s the secret to a perfect crisscross pattern on a pie crust?
Roll out the dough and cut into long strips for a crisscross design. Lay the strips across the pie filling in one direction, then weave in more strips in the other direction.
8. Can I use leaves or flowers for a natural design?
Indeed, utilizing flowers or leaves to create a natural design is beautiful. Use them as stencils for cocoa or powdered sugar, or gently press them onto the rolled-out dough.
9. How do I transfer a delicate design onto the pie crust?
Use templates or stencils for delicate patterns. Over the rolled-out dough, place the stencil and use a knife to cut around it or use it as a guide for adding details.
10. Can I mix different pie crust designs on one pie?
Of course! Piecing together different designs can make for an eye-catching and distinctive display. Try out other combos that work well together.
11. What’s the best way to add a glossy finish to my pie crust design?
Before baking, brush the pie crust with an egg wash (beaten egg mixed with a small amount of water or milk) to give it a glossy finish. It will appear bright and golden as a result.
12. How do I prevent intricate designs from losing shape during baking?
Make sure the pie crust is well-chilled before adding elaborate decorations to avoid them losing their shape. This aids in the forms maintaining their shape when baking.
YouTube Video Credits:
So Yummy

Leave a Reply