
Creative Pie Crust Designs
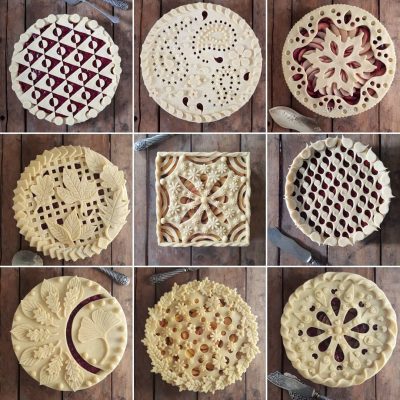
Pie crusts are a canvas waiting to be transformed into works of edible art. Adding a creative touch to your pie crust designs can make a remarkable difference, not only in appearance but also in the overall enjoyment of your delicious creations.
In this food tutorial, we will explore several stunning and unique pie crust designs that will impress your guests and elevate your baking game. Join us on this delightful journey as we delve into the step-by-step instructions for creating these visually appealing designs. Let’s get started.
Creative Pie Crust Designs
Equipment
- 1 Sharp knife
- 1 Pizza Cutter
- 1 Pie dish
- 1 Cookie cutter
- Cooking oven
Ingredients
- Pie dough
- Pie filling
Instructions
- Classic Lattice Design:The classic lattice design is a timeless favorite, adding an elegant touch to any pie. Here's how to create it:Step 1: Roll out your pie dough into a large circle.Step 2: Cut the dough into even, long strips using a sharp knife or a pizza cutter.Step 3: Lay half of the strips vertically across the pie filling, leaving an equal space between each strip.Step 4: Fold back every other vertical strip to the center of the pieStep 5: Place a horizontal strip across the unfolded vertical strips.Step 6: Fold back the vertical strips to their original position, alternating which strips are folded back.Step 7: Repeat steps 5 and 6 until the lattice covers the entire pie.Step 8: Trim any excess dough, press the edges to seal, and crimp the crust as desired.
- Braided Edge Design:The braided edge design adds a touch of intricacy to your pie crust. Follow these steps to achieve this beautiful look:Step 1: Roll out your pie dough and cut it into strips of equal width.Step 2: Take three strips and pinch the ends together to form a single point.Step 3: Braid the three strips together, gently crossing the outer strips over the center strip.Step 4: Repeat steps 2 and 3 until you have enough braided strips to go around the edge of your pie.Step 5: Moisten the edge of the pie crust with water and press the braided strips onto the moistened edge.Step 6: Trim any excess dough and crimp the crust to secure the braided strips.
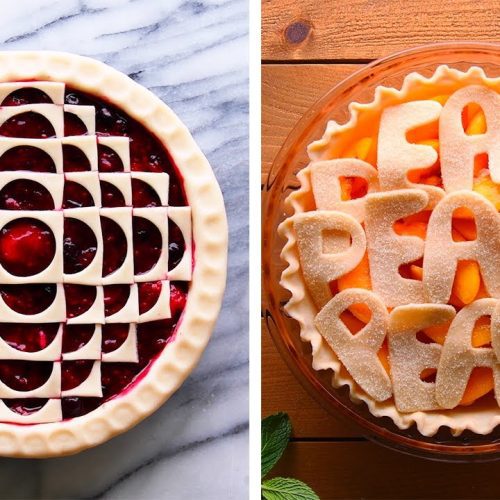
- Cutout Designs:Cutout designs add whimsy and charm to your pie crusts. Here's how to create them:Step 1: Roll out your pie dough and transfer it onto the pie dish.Step 2: Use cookie cutters or a sharp knife to cut out desired shapes from the rolled-out dough.Step 3: Arrange the cutout shapes on top of the filled pie or create a border around the edge.Step 4: Press the cutout shapes gently to adhere them to the crust, and trim any excess dough if necessary.Step 5: Proceed with baking the pie according to the recipe instructions.
- Leaf Design:The leaf design adds a natural and rustic feel to your pies. Follow these steps to bring autumnal vibes to your creations:Step 1: Roll out your pie dough and cut out leaf shapes using leaf-shaped cookie cutters or a stencil.Step 2: Arrange the leaf cutouts on top of the pie filling, overlapping them slightly to create a layered effect.Step 3: Gently press the leaves onto the filling to secure them.Step 4: Optionally, brush the leaves with an egg wash for a glossy finish.Step 5: Bake the pie as directed in the recipe.
Video
With these creative pie crust designs, you can transform your homemade pies into true masterpieces. Whether you opt for a classic lattice, a braided edge, cutout designs, or leaf motifs, these techniques will impress both your eyes and taste buds. Experiment with different shapes. Good luck.
Do let us know in the comments if you tried anyone and how it came out. Let’s know your own tips and styles.
YouTube Video Credits:
So Yummy
Frequently Asked Question on Creative Pie Crust Designs
1. What are creative pie crust designs?
Creative pie crust designs are distinctive and creative patterns, shapes, or embellishments on a pie’s crust. These designs go beyond the typical lattice or basic crimped edges, and may include complex cutouts, themed decorations, or novel techniques that lend visual appeal to the pie.
2. Can I use any type of pie dough for creative designs?
Yes, you may create artistic designs with many types of pie dough, including standard, butter-based crusts as well as vegan or gluten-free versions. To produce the needed creative aspects, use a malleable and easy-to-work-with dough.
3. What tools do I need for creating creative pie crust designs?
Tools for producing creative pie crust designs may include the following:
- Specialty pie crust cutters or stamps
- Use pastry brushes to apply washes or glazes.
- Cookie cutters in different shapes and sizes
- Stencils for complicated designs
- Rolling pin with embossing rings or printed sleeves.
4. How can I add color to my pie crust designs?
To add color to your pie crust designs, incorporate ingredients such as natural food coloring, cocoa powder, or spices into the dough. Alternatively, use edible dyes or food-safe paints to give brilliant colors to particular portions of the crust.
5. Are there any tips for ensuring my creative pie crust designs bake evenly?
To ensure even baking of creative pie crust designs:
- Roll the dough to an even thickness.
- Avoid using too thick or thin portions in your design.
- Keep an eye on the baking time and use a pie shield or foil to prevent the delicate edges from overbrowning.
- For more detailed designs, partly bake the crust before adding the filling.
6. Can I mix different pie crust designs on the same pie?
Yes, you can combine several pie crust designs on the same pie to provide a visually appealing and distinct appearance. Experiment with lattice designs, cutouts, and decorative edges to make your pie more visually appealing and interesting.
7. How far in advance can I prepare and store pie crust decorations?
Pie crust decorations can be prepared and stored ahead of time by cutting out shapes or making complicated designs and freezing them on a baking sheet. Once frozen, store the decorations in a secure container or bag. When ready to use, arrange the frozen decorations on top of the pie filling and bake as directed. This enables convenient preparation ahead of time.
How do you keep your pie crust intact when moving it from counter to top of pie? Mine tears apart.
Sorry to hear that. Here’s what might work for you – you can use a rolling pin. Try to gently roll the pie crust around your rolling pin to lift it. Lay the pin at the edge of the dough and roll the dough onto the pin. Once it’s rolled, unroll it slowly over the top of the pie. You can also try using a parchment paper. It works perfectly for me. If a small tear happens, you can simply press the dough back together once it’s on the pie. Hopefully, it’s not a big tear.