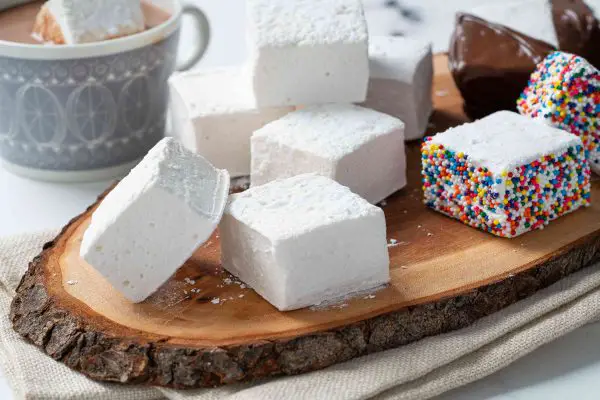
Marshmallow Recipe
Hey there foodies, let us explore another cool and exciting recipe that you can try from the comfort of your home – Marshmallow recipe.
Making marshmallows at home is a fun and rewarding process. These fluffy, sweet treats are a delicious addition to your hot cocoa, and s’mores, or even be enjoyed on their own. Homemade marshmallows are lighter and fresher than the store-bought kind, and you can customize them with flavors and shapes. This recipe will guide you through the process of making perfect marshmallows right in your kitchen, with easy-to-follow steps for a beginner-friendly experience.
A Brief History of Marshmallows:
Marshmallows have an ancient origin, with their roots tracing back to ancient Egypt. The Egyptians extracted sap from the mallow plant, found in marshy areas, to create a sweet treat. The modern marshmallow as we know it, however, didn’t emerge until the 19th century when French confectioners replaced the sap with gelatin, making the production process much easier. Today, marshmallows are a beloved confection all around the world.

Marshmallow Recipe
Equipment
- Mixing bowls
- Saucepan
- Candy thermometer
- Stand mixer or electric hand mixer
- 9x9-inch baking pan
- Parchment paper
- Sifter
Ingredients
- 3 envelopes unflavored gelatin
- 1 cup cold water, divided
- 1 ½ cups granulated sugar
- 1 cup light corn syrup
- ¼ teaspoon salt
- 1 tablespoon vanilla extract
- Powdered sugar, for dusting
- Cornstarch, for dusting
Instructions
- In the bowl of your stand mixer, pour ½ cup of cold water and sprinkle the gelatin over it. Let the gelatin bloom for about 10 minutes while you prepare the sugar syrup.
- In a medium saucepan, combine the granulated sugar, corn syrup, salt, and the remaining ½ cup of water. Place the saucepan over medium heat and stir until the sugar dissolves. Once the sugar has dissolved, stop stirring and increase the heat to medium-high.
- Attach your candy thermometer to the side of the saucepan and cook the syrup until it reaches 240°F (soft-ball stage), which should take about 8-10 minutes.
- Once the sugar syrup reaches 240°F, carefully remove it from the heat. Turn the stand mixer to low and slowly pour the hot syrup into the gelatin mixture. Be cautious as the syrup is extremely hot.
- After adding the syrup, increase the speed of the mixer to high and beat the mixture for about 10-12 minutes. The marshmallow mixture will turn white, fluffy, and thick. Add the vanilla extract during the last minute of mixing.
- While the marshmallow mixture is being whipped, prepare your baking pan by lining it with parchment paper and lightly dusting it with a mixture of powdered sugar and cornstarch. This prevents the marshmallows from sticking to the pan.
- Once the marshmallow mixture is ready, pour it into the prepared baking pan and use a spatula to smooth the top. Let the marshmallows sit uncovered for 4-6 hours or overnight to set.
- After the marshmallows have set, dust a clean surface with powdered sugar and cornstarch. Turn the marshmallows out onto the surface and cut them into squares using a sharp knife or pizza cutter. Dust each marshmallow with the sugar-cornstarch mixture to prevent sticking.
- Store your homemade marshmallows in an airtight container for up to 2 weeks.
Video
Similar Recipes:
– S’mores Brownies – Combine gooey marshmallows, graham crackers, and chocolate in a delicious brownie recipe.
– Hot Chocolate Bombs – Hollow chocolate spheres filled with cocoa mix and mini marshmallows that melt into a creamy drink.
– Rice Krispie Treats – A classic snack made with marshmallows, butter, and puffed rice cereal.
Frequently Asked Questions About Marshmallow Recipe:
1. Can I use agar-agar instead of gelatin?
Yes, agar-agar can be used as a vegetarian substitute for gelatin, but the texture will be slightly firmer.
2. How long do homemade marshmallows last?
Homemade marshmallows last for about 2 weeks when stored in an airtight container.
3. Can I add flavors to my marshmallows?
Absolutely! You can add flavors like peppermint, almond, or lemon extract during the last minute of mixing.
4. Why are my marshmallows sticky?
Marshmallows can become sticky if they’re not dusted with enough powdered sugar and cornstarch. Be generous with the dusting to prevent sticking.
5. Can I color the marshmallows?
Yes, you can add food coloring to the marshmallow mixture before pouring it into the pan for colorful treats.
6. Do I need a candy thermometer?
Yes, a candy thermometer is essential to ensure the sugar syrup reaches the correct temperature for fluffy marshmallows.
7. Can I make marshmallows without a stand mixer?
You can use a hand mixer, but it may take longer to whip the mixture to the right consistency, and you’ll need some arm strength!
8. Why didn’t my marshmallows set properly?
If the sugar syrup wasn’t heated to the right temperature, or if the marshmallow mixture wasn’t whipped long enough, they may not set properly.
9. Can I use marshmallows in baking?
Yes, marshmallows are great for baking into brownies, cookies, or using as a topping for sweet casseroles like sweet potato pie.
10. How do I store homemade marshmallows?
Store them in an airtight container at room temperature. Avoid refrigerating them as the moisture can make them sticky.
Conclusion:
Homemade marshmallows are a delightful treat that brings a bit of sweetness to any occasion. Whether enjoyed as a snack, added to hot chocolate, or used in s’mores, this recipe is versatile and simple to make. Once you’ve mastered the basic marshmallow, feel free to experiment with flavors, colors, and shapes to suit your taste!
YouTube Video Credits:
Preppy Kitchen

Leave a Reply